
Before Christmas, I wrote about how I used the Watson Relationship Extraction service on Bluemix to pick out the things mentioned in news stories, as part of a mobile app we built on a hackday. I’d still like to do something more with that app, but in the meantime I should at least share how I did the Relationship Extraction bit.
From the official doc for the service:
From unstructured text, Relationship Extraction can extract entities (such as people, locations, organizations, events), and the relationships between these entities (such as person employed-by organization, person resides-in location).
This is provided as a hosted service on IBM Bluemix where any developer can sign up and give it a try.
It’s available as a documented REST API, but as part of using it in the hackday, I needed to write a bit of code around that, just to prepare the request and parse the response. I think it’ll save me time to reuse this the next time I want to build something with the API, so I’m sharing it as a standalone package.
In this post, I’ll walk though how you can use it, with a small app that grabs the contents of a BBC News story and picks out the names of people mentioned in the story.
First, a simpler example. Consider this exciting text:
Dale Lane works as a developer for IBM. He started in 2003. Dale lives in the UK, in a town called Eastleigh. Before that, he was a student at the University of Bath.
A few lines of Javascript are enough to run that through the service.
var text = '';
var watson = require('extract-relationships');
watson.extract(text, function(err, response) {
    // response has got all the info
});
The full contents of response is in a gist if you want to see it, but I’ll show just a few examples here to give you the idea.

It has picked out all of the references to me, recognising that they are all describing a person, and that ‘developer’ is my occupation.
The ‘begin’ and ‘end’ numbers tell you where in the text each bit was found.

It’s picked out the reference to IBM, and recognised that this is a name of a commercial organisation.

It’s recognised that ‘2003’ is a reference to a date.
As well as identifying those entities and many others, it’s also picked out the relationships between them.

For example, it’s identified the relationship between me and IBM.

And the relationship between me and my old University.
I’ve written a more detailed breakdown of what is contained in the response including how to find out what each of the fields mean, and what the different possible values for each one are.
That’s the basics with a few input sentences. Next, we start throwing a lot of text at it.
In about thirty lines of Javascript, you can download the text from a news story on the BBC News website, and pick out the names of all of the people mentioned in the story.
If you run that simple example, you get the list of people that are included in the story text.
Where it starts to get interesting is when you combine this with other sources and APIs.
For example, once you’ve picked out the names of people from the story, try looking up their profiles on Wikipedia, and finding out who they are.
Or, instead of people, pick out the names of places from news stories, and use a geocoding API to plot them on a map. (There are geocoding services available on Bluemix, too, if that helps.)
Hopefully you can see how you could start to use this in your own apps.
Finally, some practical points.
How do you install the package I’ve shared so you can use it?
npm install --save extract-relationships
How do you configure it for the Watson Relationship Extraction Service?
The API we’re using is an authenticated service hosted in IBM Bluemix, so there is a tiny bit of config you need to do first before you can use it.
If you’re running your app in Bluemix, then there isn’t much to do. Add the Relationship Extraction service to your app from the Bluemix dashboard, and the endpoint and credentials will automatically be provided and should just work.
If you’re running your app on your own machine, there are a couple of extra steps instead.
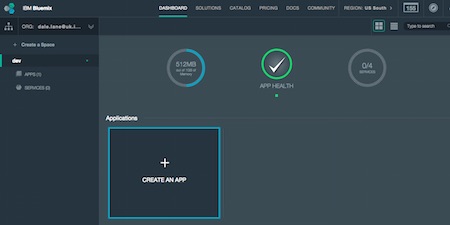
Go to Bluemix. Sign up for an account if you haven’t already got on

From the dashboard, create an app. You need something as a placeholder to bind the Relationship Extraction service to, even if you don’t use it.
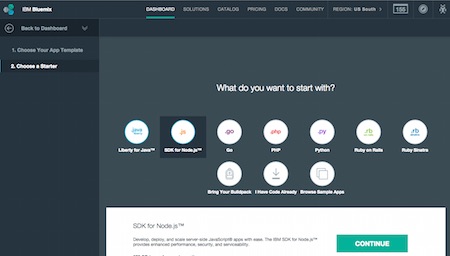
Create a web app and give it a name.
Add a service.
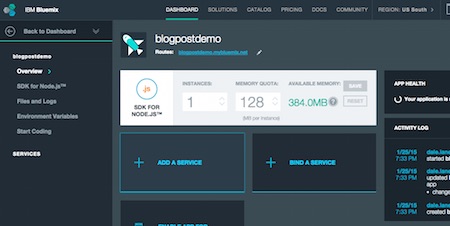
Choose the Relationship Extraction service from the group of Watson services.

Click on ‘Show Credentials’. Everything you need to configure your app is in here. You need the url, username and password.
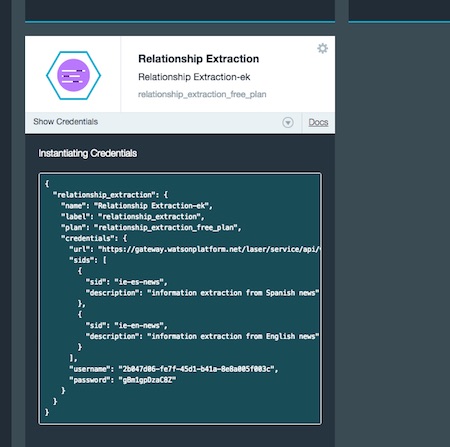
Copy this into an options object like this:
var options = {
    api : {
        url : 'https://url.of.your.watson.service...',
        user : 'your-watson-service-username',
        pass : 'your-watson-service-password'
    }
};
To reiterate, this isn’t the username and password that you use to sign in to Bluemix. It’s the username and password specifically for this service that Bluemix has generated for your app.
It’s not a good idea to hard-code passwords in your code, so I’d suggest putting them outside of your app and grabbing them in when needed. Environment variables are an easy way to do this, and are what I’ve done in the few samples I’ve written.
That’s all there is to it.
I’ve put more info on github with the source for how I’m using the API.
Feed footer idea nicked from 43 Folders using the FeedEntryHeader WordPress plugin.