Watson Rock, Paper, Scissors

A simple hands-on activity to let kids train a machine learning classifier to be able to play Rock, Paper, Scissors.

Screen Shot 2016-06-26 at 13.59.20

I’ve written and spoken before that I think we should do more to introduce children to the idea of machine learning. And I’ve tried introducing my two kids to it, such as by making a Code Club-style game with them: we built a system to play Guess Who, that they trained both to understand what you say and to recognise the characteristics of faces from photos.

This weekend, we tried out another idea – Rock, Paper, Scissors from a web app, using the web cam to see your moves, and training a system to recognise your hand signs.

DSC06146

In many ways, this was simpler than the Guess Who project, and one I would’ve tried before if we’d thought of it! I’ve made getting the system to choose it’s next move very simple, as it just chooses one of the three options at random.

The machine learning element comes from the fact that I got them to train a custom image classifier to recognise what a ‘rock’, ‘paper’ and ‘scissors’ hand sign looks like.

DSC06153

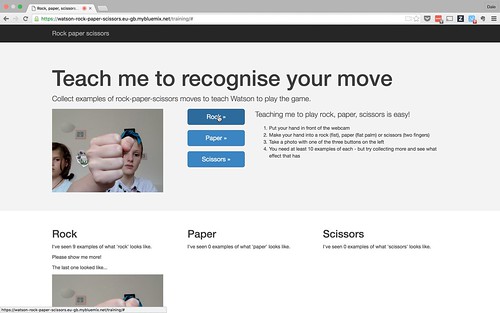
Last night I hacked together a quick single-page training web app for them to use. Unlike with the Guess Who game, where we worked on it together to come up with the project, this time I made it myself to see how they’d get on with using it. (I was thinking that if it went well, I’d try using it with one of my school groups).

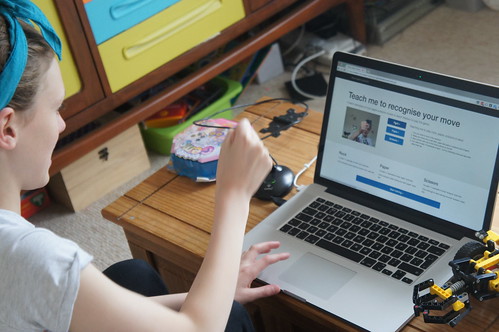
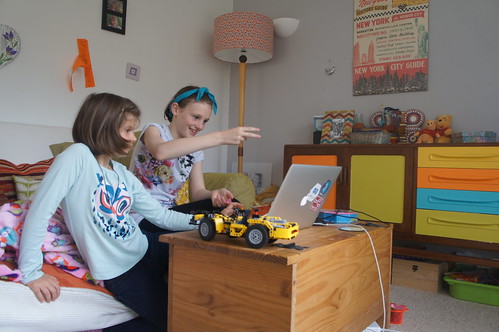
They got off to a good start… although I hadn’t counted on how much time Grace would spend checking out her hair once she saw the web cam video. 🙂


Video of the kids getting started

I’ve got it so that you can take photos from the web cam by clicking on a button, and put the photo into one of three training groups – one each for rock, paper and scissors.

DSC06150

My hope was that the three hand signs – a fist, a flat palm, and two fingers – are distinct enough that an image classifier could quickly start to distinguish between them.

Although I should probably add some overlay to the live video to suggest where to put your hand, how close to the camera, etc. as their initial attempts were fairly inconsistent.


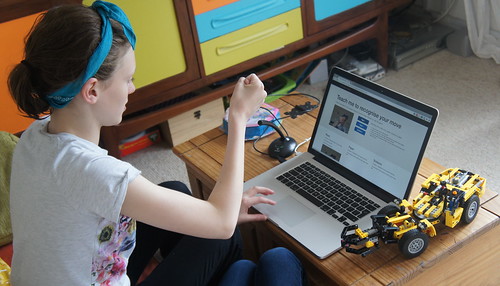
Video of their first attempt at training

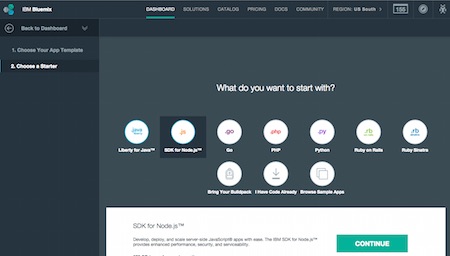
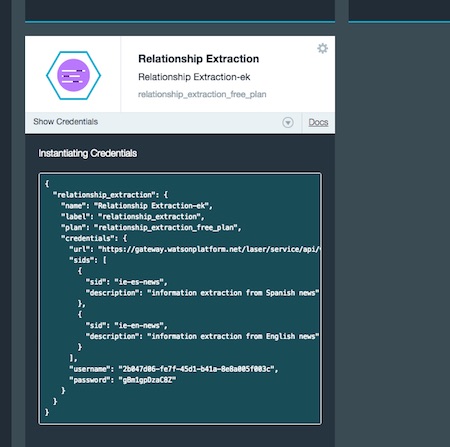
As before, I’m using one of the Watson developer APIs available in Bluemix, called Visual Recognition.

To train it, you just need to upload zip files, where each zip file contains examples of photos of something you want to recognise.

In this case, we want to upload three zip files – one of photos of “rock”, one zip file of “paper” photos, one zip file of photos of “scissors”. And you can do all of that in a single HTTP POST, so the code behind the training app is very simple.

DSC06152

That said, I should still share the code.

It was hacked together in an evening, so it’s a complete mess. But I’ll try and find some spare time this week to tidy it up, and put the code somewhere in case it’s helpful. Some of the code for driving the webcam, zipping up the photos, and uploading them, might be useful to someone.


The first test

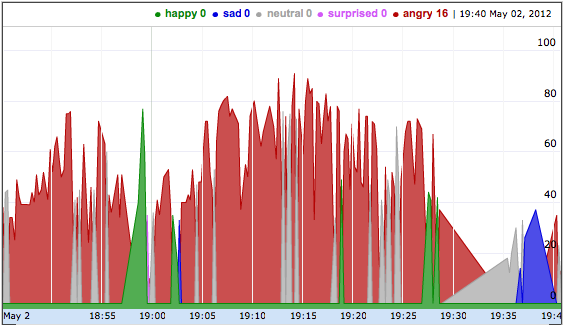
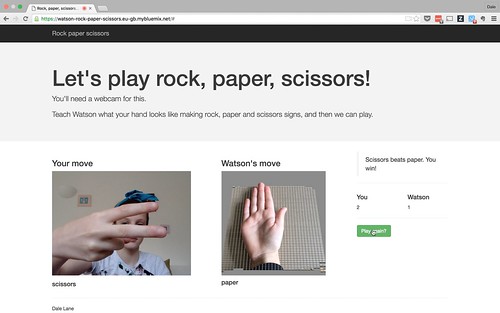
To test it, I made a simple game. I’ve got it keeping score to see how many moves you win against the random choices the game makes. Although Grace seemed more interested in counting the number of times the game correctly identified our moves. It wasn’t perfect!

(The “Watson’s move” images used in the game bit were made by Faith. She took photos of her own hand using an iPad, and did the weird grid background effect using PopAGraph. It wasn’t quite what I expected, but I think it looks kinda neat.)

Screen Shot 2016-06-26 at 13.57.16

As with the Guess Who activity, what most interested me was the girls’ reactions to the behaviour of the ML system. I was surprised that even after last time, their initial assumption was still that they could take one photo of each, and that would be enough. (Another reason why it’s worth doing a few of these activities to reinforce it).

But with a little nudging, they quickly saw how that the more examples they gave, the better the system performed.

Other than that, a lot of the lessons they learned were reminders of what we talked about before about what it’s like doing supervised learning projects.


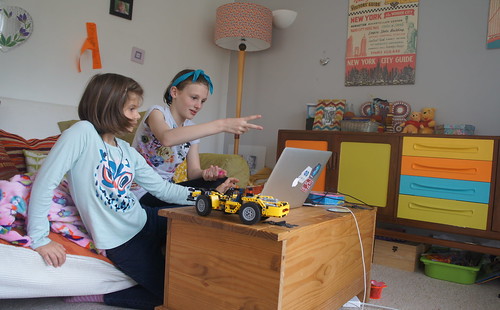
The second attempt… another test after more training this time

One thing I was impressed with was when they thought that the training would be more effective if they used an actual rock, actual scissors, and a sheet of paper. Doing that made the accuracy a hundred times better. That makes sense, as they are much more distinct than all photos of hands, so that was a neat idea!

And that’s pretty much it. My second experiment at getting the kids to play with machine learning seemed to work pretty well.

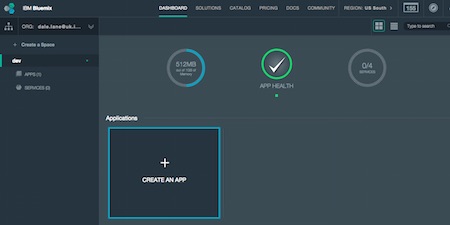
I’ve put the app I made for them up on Bluemix so you’re welcome to give it a try it you like. It’s at https://watson-rock-paper-scissors.eu-gb.mybluemix.net.

You’ll have to get your own Visual Recognition API key to use it, though, but that supports a free trial, so hopefully that won’t put you off!


Third time lucky? Another test


Update 1:

A couple of friends pointed me at another recent IBM rock, paper, scissors project when I mentioned planning to do this.

It looks like a great project and is well worth a look – they’ve gone into using Apache Spark to create a system able look for patterns in how people play rock-paper-scissors and learn strategies to win the game.

More recently, they’ve even gotten a NAO robot to play the game for them!

I wasn’t aware of this work before, but decided to go ahead with our project anyway. Partly because my focus was different for this, but mostly because I think that the Agonies of Parallel Creation should never stop us from creating and sharing stuff. There’s no new idea under the sun, so if we wait for an idea that no-one has ever got close to, we’d stop creating anything.

That said, it’s a particularly surreal coincidence in this case, as this is not only an IBM project, but the author of that post is the great David Taieb who I used to work for when he worked on Watson! Small world.


Update 2:

Yes, I know you can see my API key in the video. But don’t worry. Bluemix makes it easy enough to revoke credentials so I’ve deleted that API key. Doing that was much quicker than learning enough video editing to be able to mask it out. 🙂

DSC06149


An introduction to machine learning with Guess Who

I tried introducing my two kids to machine learning by helping them make a game this week.

In this post, I’ll try and explain why, how we did it, and how it went. And if you make it all the way to an end, I’ve got some videos and a link to a demo to show you what we made.

Why

I think we need to introduce the basic concept of machine learning to children.

I think the current approach to introducing coding using things like Scratch aren’t enough. This isn’t to say Scratch isn’t great (I’ve been running a Code Club every week for the last couple of years, delivered almost entirely using Scratch, so I’d be the last person to say it isn’t a fantastic tool). It lets you snap together blocks representing actions to teach the programming mindset of getting a computer to do something by you breaking the task down into a series of steps.

I think we need to add to this with something that introduces the model of machine learning – getting a computer to do something by training it with examples of doing that task.

I’ve been saying this for a while – I gave a talk about it at an education conference last year, I’ve written about it here before, and it was the theme of a lecture I gave at a science society in London last month.

This week is half-term and I have the week off work, so I thought I’d finally spend a bit of time trying it out by experimenting on my own two daughters (Faith and Grace, who are aged 7 and 11).

In Code Club, I mostly try to introduce programming concepts by helping the kids to create games. Sticking with what seems to work, I’ve helped them to make a game by training an ML system how to play it.

How

We’ve been making a sort of Guess Who? game – a game that I’ve played with the kids for years and that they know inside out.

Guess-Who-Closeup.jpg

The idea is that the computer shows a bunch of faces and chooses one of them at random. You have to work out which one it’s chosen by asking Yes/No questions about their appearance.

I introduced this to Grace and Faith mostly using analogies and anthropomorphising.

“We need to teach the computer how to play the game instead of telling it how to”.

“We’ll do it the same way that you teach a small child to do something, not by telling it the series of steps to take but by showing it examples of how it should be done, over and over, until it learns how to do it”.

And so on.

I went with a couple of opportunities for trying out machine learning approaches.

Understanding the question

As a player, we let you ask questions in natural language. You’ve just got a text box to type in anything you want to ask. In practice though, there’s a reasonably predictable set of questions you might ask – it’s a very constrained domain. So it lends itself well to using a text classifier.

I got the kids to make a list of all the types of questions they ask in a Guess Who game. These were the classes we’d train the system with (e.g. “has brown hair” or “is wearing a hat”). Then for each class, they had to come up with as many ways as they could think of to ask that question.

the kids using Watson NLC

We used this to train IBM Watson Natural Language Classifier.

I chose it mostly because I’m familiar with it, it’s a hosted readily available service so there was nothing to install or configure, it has a simple web interface for training that the kids could use to enter the classes and texts they thought of, and for this sort of kicking-the-tyres-with-minimal-usage it’s free.

With a little training, they had a trained classifier that would be able to take a question from the player and map it to one of the classes they’d come up with for the questions they ask when they play Guess Who.

Answering the question

The next step was to train the system to be able to answer the questions. We needed it to be able to recognise visual characteristics in a photo. Again, this is a constrained domain, although less so than for classifying questions. But still, this was basically a classifying task, albeit with the extra challenge of using images.

We looked for a collection of face images that we could use, both for training, and for the game itself. We initially started trying out Labeled Wikipedia Faces, but ultimately settled on using Labeled Faces in the Wild – a set of over 13,000 photos of faces.

Grace, preparing the training for Visual Recognition

I got the kids to group examples of the faces based on the characteristics they’d come up with in their list of text classes. We just used the built-in OSX Finder to do this.

One folder open on the left with all the unsorted faces in, and a bunch of folders open to the right – e.g. “short-hair”, “long-hair”, “bald”, “hat”. They scrolled through the unsorted pictures, and trained by dragging the photos across into the relevant folder.

We used an IBM Watson API with this, too : IBM Watson Visual Recognition

Again, I chose it because I’m familiar with it, and it’s a hosted service I didn’t need to install or run, and while it’s in beta it’s all free to use.

Putting it all together

While they did that, I hacked together up a quick game to drive it. They were in charge of training, I wrote a simple REST API to make the requests to the Watson APIs, and a UI to let the player interact with it.

We had our game!

How it went

I asked them what they’d learned from doing it, and they came up with things like:

“You need a lot of training data”

When I explained how we’d train the visual recognition classifiers to recognise characteristics in photos, Faith said “We could take photos of each other and use those!”. I said that we’d need more than that, so she said “I could take photos of my friends as well!”.

But we needed so many more than that. We started by looking to Wikipedia (always a good starting point for getting data!), before eventually settling on the LFW set.

Getting them to help me find the training data gave them an idea of the sort of scale you need for these sorts of projects, as well as giving them an insight into ideas like gathering existing data rather than trying to manually create it.

“The more training you give it, the better it gets”

We did this project off-and-on throughout half-term week rather than all in one sitting. And we re-ran the training after each go. It was really clear the way that the results improved the more that we did.

I’m a big fan of learning by doing, and I think that seeing that for themselves was more effective than if I’d just told them. Trying it out with virtually no training, and seeing that it’s rubbish. Then trying it out with a bit of training, and see it start to get better. Then trying it again after a few days and see it really improving – there was a definite light bulb moment.

“Training is fun at first, but can get a bit boring after a while”

This was more an issue with the visual recognition training rather than the NLC text classifier training. Even after the first afternoon they’d already come up with a classifier that was doing a decent job of most questions. But grouping the photos into the training sets took much longer. And to be honest, it really needs more training than they did if you wanted to turn this into a proper demo or game – I let them do enough to get the idea, but stopped them before it became a miserable chore!

But this was a positive thing. As a takeaway, that’s a really valid and valuable insight. I’ve seen commercial ML projects fail to recognise this at the outset! Training ML systems is a repetitive, manual and very time-consuming task that does get boring for the people involved.

We talked about ways that people try and get around that, like trying to turn it into a game. Grace thought that if we did this as a school activity, with all her class helping out with the training, then split between 30 kids, it wouldn’t take as long.

All of these points – the amount of time and work needed to train, approaches like getting a large number of people to train, etc. – these are all great lessons about the practicalities of using machine learning.

“It’s a bit like magic”

If you had to describe the steps involved in working out if a photo included a face that has a moustache, that would be pretty complicated. But dividing 100 photos into two groups – faces with a moustache, and faces without a moustache – that’s easy.

There were a bunch of things they talked about here that was really positive – that doing this is easy, and you don’t need you to understand the deep detail behind how it works. With Faith (my youngest) we didn’t go into too much detail about how the training works, but Grace and I did find some videos on YouTube that explained the principles behind deep learning which were interesting.

More generally, what I wanted them to learn was that computers can spot patterns in data, without you needing to be able to specify rules that they should follow. And I think that’s a more effective lesson as something they saw and did for themselves rather than just reading or hearing about it.

The result


https://youtu.be/oguzXlRT4NQ

I’ve put what we came up with on Bluemix at http://guesswho.eu-gb.mybluemix.net

I’ve also put some more videos below to show us trying it out.

As I explained above, it’s not really “finished” – I think it needs more training, and the UI was hacked together in a hurry. But even as a quick half-term project, I think it already shows a glimmer of what is possible.

More importantly, it shows that you can give kids a hands-on introduction to machine learning.


https://youtu.be/1AkSVBzE5io


https://youtu.be/6ay7MqhW53g


https://youtu.be/Z3UReJzzY4Q


https://youtu.be/GNcz_D62_0w


How to use the IBM Watson Relationship Extraction service on Bluemix

Before Christmas, I wrote about how I used the Watson Relationship Extraction service on Bluemix to pick out the things mentioned in news stories, as part of a mobile app we built on a hackday. I’d still like to do something more with that app, but in the meantime I should at least share how I did the Relationship Extraction bit.

From the official doc for the service:

From unstructured text, Relationship Extraction can extract entities (such as people, locations, organizations, events), and the relationships between these entities (such as person employed-by organization, person resides-in location).

This is provided as a hosted service on IBM Bluemix where any developer can sign up and give it a try.

It’s available as a documented REST API, but as part of using it in the hackday, I needed to write a bit of code around that, just to prepare the request and parse the response. I think it’ll save me time to reuse this the next time I want to build something with the API, so I’m sharing it as a standalone package.

In this post, I’ll walk though how you can use it, with a small app that grabs the contents of a BBC News story and picks out the names of people mentioned in the story.

First, a simpler example. Consider this exciting text:

Dale Lane works as a developer for IBM. He started in 2003. Dale lives in the UK, in a town called Eastleigh. Before that, he was a student at the University of Bath.

A few lines of Javascript are enough to run that through the service.

var text = '';
var watson = require('extract-relationships');
watson.extract(text, function(err, response) {
    // response has got all the info  
});

The full contents of response is in a gist if you want to see it, but I’ll show just a few examples here to give you the idea.

screenshot

It has picked out all of the references to me, recognising that they are all describing a person, and that ‘developer’ is my occupation.

The ‘begin’ and ‘end’ numbers tell you where in the text each bit was found.

screenshot

It’s picked out the reference to IBM, and recognised that this is a name of a commercial organisation.

screenshot

It’s recognised that ‘2003’ is a reference to a date.

As well as identifying those entities and many others, it’s also picked out the relationships between them.

screenshot

For example, it’s identified the relationship between me and IBM.

screenshot

And the relationship between me and my old University.

I’ve written a more detailed breakdown of what is contained in the response including how to find out what each of the fields mean, and what the different possible values for each one are.

That’s the basics with a few input sentences. Next, we start throwing a lot of text at it.

In about thirty lines of Javascript, you can download the text from a news story on the BBC News website, and pick out the names of all of the people mentioned in the story.

If you run that simple example, you get the list of people that are included in the story text.

Where it starts to get interesting is when you combine this with other sources and APIs.

For example, once you’ve picked out the names of people from the story, try looking up their profiles on Wikipedia, and finding out who they are.

Or, instead of people, pick out the names of places from news stories, and use a geocoding API to plot them on a map. (There are geocoding services available on Bluemix, too, if that helps.)

Hopefully you can see how you could start to use this in your own apps.

Finally, some practical points.

How do you install the package I’ve shared so you can use it?

npm install --save extract-relationships

How do you configure it for the Watson Relationship Extraction Service?

The API we’re using is an authenticated service hosted in IBM Bluemix, so there is a tiny bit of config you need to do first before you can use it.

If you’re running your app in Bluemix, then there isn’t much to do. Add the Relationship Extraction service to your app from the Bluemix dashboard, and the endpoint and credentials will automatically be provided and should just work.

If you’re running your app on your own machine, there are a couple of extra steps instead.

Go to Bluemix. Sign up for an account if you haven’t already got on

screenshot

From the dashboard, create an app. You need something as a placeholder to bind the Relationship Extraction service to, even if you don’t use it.

screenshot

Create a web app and give it a name.

screenshot

Add a service.

screenshot

Choose the Relationship Extraction service from the group of Watson services.

screenshot

Click on ‘Show Credentials’. Everything you need to configure your app is in here. You need the url, username and password.

screenshot

Copy this into an options object like this:

var options = {
    api : {
        url : 'https://url.of.your.watson.service...',
        user : 'your-watson-service-username',
        pass : 'your-watson-service-password'
    }
};

To reiterate, this isn’t the username and password that you use to sign in to Bluemix. It’s the username and password specifically for this service that Bluemix has generated for your app.

It’s not a good idea to hard-code passwords in your code, so I’d suggest putting them outside of your app and grabbing them in when needed. Environment variables are an easy way to do this, and are what I’ve done in the few samples I’ve written.

That’s all there is to it.

I’ve put more info on github with the source for how I’m using the API.


Watson News Companion

newscompanion screenshotWe recently ran a hackathon at work: people within IBM were invited to try building a mobile app aimed at consumers using Watson services. It was a fun chance to try out some new ideas, as well as to build something using our APIs – dogfooding is always a good thing.

I worked on a hack with David which we submitted on Wednesday. This is what we came up with, and how we built it.

The idea

A mobile app that will help users to digest the news by explaining references in stories and providing greater context.

Background

It’s difficult to find the time nowadays to properly read and understand what’s going on in the world. We rarely have the time to sit and read through a newspaper. Instead, we might quickly read news stories online from our smartphones and tablets. But that often makes it difficult to understand the broader context that a story is in. There might be references in the story to people, places, organisations or events that are unfamiliar.

Watson could help. It could be an assistant as you read the news, explaining unfamiliar references and the broader context.

Features

Our Watson News Companion demo is a mobile news reader app that:

  • anticipates questions and suggests areas where it can help improve understanding
  • provides answers to questions without needing the users to lose their place in the story
  • allow the user to dig deeper with their own follow-up questions


A video walkthrough of the hack

Implementation

The hack was built as a mobile web app using the MEAN stack: using express as the framework on a Node.js platform, storing some information in a MongoDB and building the UI with AngularJS.

It uses RSS feeds from news websites to fetch content, which are shown in a simple newsreader app built using Ratchet.

The contents of the story is run through the Watson Relationship Extraction API to pick out the people, places, organisations, and other entities mentioned in the story.

The API output includes co-references, to identify the multiple mentions of the same entity. These are combined and reviewed, and together with the type of the entity are used to generate likely questions about the entity.

These questions are sent to the Watson Question and Answer API. For questions which are returned with answers with a high confidence, annotations are added inline to the news story. Pressing the annotation brings up a sliding panel at the bottom of the screen with the answer to the question. The links and footer annotations are built using bigfoot.

Every screen in the app also includes an “Ask Watson” button which lets the user enters any free text question to let them dig deeper into what they’ve read.

Could you build this?

This was a proof-of-concept built in a hurry, so we’re not calling this a finished app. But everything we used is freely available – both to people inside IBM and the public.

We developed on an instance of Bluemix (our Cloud Foundry-based development platform) available internally within IBM. You can sign up for free to a public instance of Bluemix at bluemix.net.

The technologies used to build the hack are all freely available : Node.js, MongoDB, AngularJS, Ratchet, bigfoot, jQuery.

A beta version of the Watson Relationship Extraction API is freely available for apps hosted on Bluemix.

A beta version of the Watson Question and Answer API is freely available for apps hosted on Bluemix. But this is a demo instance of Watson that has only read a small number of general healthcare documents. That’s not a useful corpus for our hack, so to record our demo we stood up our own instance – using an untrained instance of Watson which we gave a small subset of Wikipedia to read. We used the Question and Answer API on this instance instead of the Bluemix one. For people outside IBM to do this, they need to sign up to join the Watson Ecosystem. This is also free, but there are criteria for who is eligible at this point, and an application process to go through.


Text analytics in BlueMix using UIMA

In this post, I want to explain how to create a text analytics application in BlueMix using UIMA, and share sample code to show how to get started.

First, some background if you’re unfamiliar with the jargon.

What is UIMA?

UIMA (Unstructured Information Management Architecture) is an Apache framework for building analytics applications for unstructured information and the OASIS standard for content analytics.

I’ve written about it before, having used it on a few projects when I was in ETS, and on other side projects since such as building a conversational interface to web pages.

It’s perhaps better known for providing the architecture for the question answering system IBM Watson.

What is BlueMix?

BlueMix is IBM’s new Platform-as-a-Service (PaaS) offering, built on top of Cloud Foundry to provide a cloud development platform.

It’s in open beta at the moment, so you can sign up and have a play.

I’ve never used BlueMix before, or Cloud Foundry for that matter, so this was a chance for me to write my first app for it.

A UIMA “Hello World” for BlueMix

I’ve written a small sample to show how UIMA and BlueMix can work together. It provides a REST API that you can submit text to, and get back a JSON response with some attributes found in the text (long words, capitalised words, and strings that look like email addresses).

The “analytics” that the app is doing is trivial at best, but this is just a Hello World. For now my aim isn’t to produce a useful analytics solution, but to walk through the configuration needed to define a UIMA analytics pipeline, wrap it in a REST API using Wink, and deploy it as a BlueMix application.

When I get a chance, I’ll write a follow-up post on making something more useful.

You can try out the sample on BlueMix as it’s deployed to bluemix.net

The source is on GitHub at github.com/dalelane/bluemixuima.

In the rest of this post, I’ll walk through some of the implementation details.

Runtimes and services

Creating an application in BlueMix is already well documented so I won’t reiterate those steps, other than to say that as Apache UIMA is a Java SDK and framework, I use the Liberty for Java runtime.

I’m not using any of the services in this simple sample.

Manifest

The app is bundled up in a war file, which is what we deploy. This is specified in manifest.yml.

Building

The war file is built by an ant task which has to include the UIMA jar in the classpath, and copy my UIMA descriptor XML files into the war.

I’m developing in eclipse, so I set up an ant builder to run the build, and configured the project to do it automatically.

I’m deploying from eclipse, too, using the Cloud Foundry plugins for eclipse.

XML descriptors

The type system is defined in an XML descriptor file and specifies the different annotations that can be created by this pipeline, and the attributes that they have.

Running JCasGen in eclipse on that descriptor generates Java classes representing those types.

The pipeline is also defined in XML descriptors: one overall aggregate descriptor which imports three primitive descriptors for each of the three annotators in my sample pipeline : one to find email addresses, one to find capitalised words and one to find long words.

Note that the imports in the aggregate descriptor need to be relative so that they keep working once you deploy to BlueMix.

These XML descriptor files are all added to the war file by being included in the build.xml with a fileset include.

Annotators

Each of the primitive descriptor files specifies the fully qualified class name for the Java implementation of the annotator.

There are three annotators in this sample. (XML files with names starting “primitiveAeDescriptor”).

Each one is implemented by a Java class that extends JCasAnnotator_ImplBase.

Each uses a regular expression to find things to annotate in the text. This isn’t intended to be an indication that this is how things should be done, just that it makes for a simple and stateless demonstration without any additional dependencies.

The simplest is the regex used to find capitalised words in WordCaseAnnotator and the most complex is the ridiculously painful one used to find email addresses in EmailAnnotator.

Note that the regexes are prepared in the annotator initializer, and reused for each new CAS to process, to improve performance.

UIMA pipeline

The UIMA pipeline is defined in a single Java class.

It finds the XML descriptor for the pipeline by looking in the location where BlueMix will unpack the war.

It creates a CAS pool to make it easier to handle multiple concurrent requests, and avoid the overhead of creating a CAS for every request.

Once the pipeline is initialised, it is ready to handle incoming analysis requests.

Once the CAS has passed through the pipeline, the annotations are immediately copied out of the CAS into a POJO, so that the CAS can be returned to the pool.

REST API

The war file deployed to BlueMix contains a web.xml which specifies the servlet that implements the REST API.

I’m using Wink to implement the API. The servlet definition in the web.xml specifies where to find the list of API endpoints and the URL where the API should be.

The list of API endpoints is a list of classes that Wink uses. There is only one API endpoint, so only one class listed.

The API implementation is a very thin wrapper around the Pipeline class.

Everything is defined using annotations, and Wink handles turning the response into a JSON payload.

That’s it

I think that’s pretty much it.

I’ve added a simple front-end webpage, with a script to submit API requests for people who don’t want to do it with something like curl.

It’s live at uimahelloworld.mybluemix.net.

Like I said, it’s very simple. The Java itself isn’t particularly complex. My reason for sharing it was to provide a boilerplate config for defining a UIMA analytics pipeline, wrapping it in a REST API, and deploying it to BlueMix.

Once you’ve got that working, you can do text analytics in BlueMix as complex as whatever you can dream up for your annotators.

When I get time, I’ll write a follow-up post sharing what that could look like.


Smile!

This is my mood (as identified from my facial expressions) over time while watching Never Mind the Buzzcocks.

The green areas are times where I looked happy.

This shows my mood while playing XBox Live. Badly.

The red areas are times where I looked cross.

I smile more while watching comedies than when getting shot in the head. Shocker, eh?

A couple of years ago, I played with the idea of capturing my TV viewing habits and making some visualisations from them. This is a sort of return to that idea in a way.

A webcam lives on the top of our TV, mainly for skype calls. I was thinking that when watching TV, we’re often more or less looking at the webcam. What could it capture?

What about keeping track of how much I smile while watching a comedy, as a way of measuring which comedies I find funnier?

This suggests that, overall, I might’ve found Mock the Week funnier. But, this shows my facial expressions while watching Mock the Week.

It seems that, unlike with Buzzcocks, I really enjoyed the beginning bit, then perhaps got a bit less enthusiastic after a bit.

What about The Daily Show with Jon Stewart?

I think the two neutral bits are breaks for adverts.

Or classifying facial expressions by mood and looking for the dominant mood while watching something more serious on TV?

This shows my facial expressions while catching a bit of Newsnight.

On the whole, my expression remained reasonably neutral whilst watching the news, but you can see where I visibly reacted to a few of the news items.

Or looking to see how I react to playing different games on the XBox?

This shows my facial expressions while playing Modern Warfare 3 last night.

Mostly “sad”, as I kept getting shot in the head. With occasional moments where something made me smile or laugh, presumably when something went well.

Compare that with what I looked like while playing Blur (a car racing game).

It seems that I looked a little more aggressive while driving than running around getting shot. For last night, at any rate.

Not just about watching TV

I’m using face recognition to tell my expressions apart from other people in the room. This means there is also a bunch of stuff I could look into around how my expressions change based on who else is in the room, and their expressions?

For example, looking at how much of the time I spend smiling when I’m the only one in the room, compared with when one or both of my kids are in the room.

To be fair, this isn’t a scientific comparison. There are lots of factors here – for example, when the girls are in the room, I’ll probably be doing a different activity (such as playing a game with them or reading a story) to what I would be doing when by myself (typically doing some work on my laptop, or reading). This could be showing how much I smile based on which activity I’m doing. But I thought it was a cute result, anyway.

Limitations

This isn’t sophisticated stuff.

The webcam is an old, cheap one that only has a maximum resolution of 640×480, and I’m sat at the other end of the room to it. I can’t capture fine facial detail here.

I’m not doing anything complicated with video feeds. I’m just sampling by taking photos at regular intervals. You could reasonably argue that the funniest joke in the world isn’t going to get me to sustain a broad smile for over a minute, so there is a lot being missed here.

And my y-axis is a little suspect. I’m using the percentage level of confidence that the classifier had in identifying the mood. I’m doing this on the assumption that the more confident the classifier was, the stronger or more pronounced my facial expression probably was.

Regardless of all of this, I think the idea is kind of interesting.

How does it work?

The media server under the TV runs Ubuntu, so I had a lot of options. My language-of-choice for quick hacks is Python, so I used pygame to capture stills from the webcam.

For the complicated facial stuff, I’m using web services from face.com.

They have a REST API for uploading a photo to, getting back a blob of JSON with information about faces detected in the photo. This includes a guess at the gender, a description of mood from the facial expression, whether the face is smiling, and even an estimated age (often not complimentary!).

I used a Python client library from github to build the requests, so getting this working took no time at all.

There is a face recognition REST API. You can train the system to recognise certain faces. I didn’t write any code to do this, as I don’t need to do it again, so I did this using the API sandbox on the face.com website. I gave it a dozen or so photos with my face in, which seemed to be more than enough for the system to be able to tell me apart from someone else in the room.

My monitoring code puts what it measures about me in one log, and what it measures about anyone else in a second “guest log”.

This is the result of one evening’s playing, so I’ve not really finished with this. I think there is more to do with it, but for what it’s worth, this is what I’ve come up with so far.

The script

####################################################
#  IMPORTS
####################################################

# imports for capturing a frame from the webcam
import pygame.camera
import pygame.image

# import for detecting faces in the photo
import face_client

# import for storing data
from pysqlite2 import dbapi2 as sqlite

# miscellaneous imports
from time import strftime, localtime, sleep
import os
import sys

####################################################
# CONSTANTS
####################################################

DB_FILE_PATH="/home/dale/dev/audiencemonitor/data/log.db"
FACE_COM_APIKEY="MY_API_KEY_HERE"
FACE_COM_APISECRET="MY_API_SECRET_HERE"
DALELANE_FACETAG="dalelane@dale.lane"
POLL_FREQUENCY_SECONDS=3

class AudienceMonitor():

    #
    # prepare the database where we store the results
    #
    def initialiseDB(self):
        self.connection = sqlite.connect(DB_FILE_PATH, detect_types=sqlite.PARSE_DECLTYPES|sqlite.PARSE_COLNAMES)
        cursor = self.connection.cursor()

        cursor.execute('SELECT name FROM sqlite_master WHERE type="table" AND NAME="facelog" ORDER BY name')
        if not cursor.fetchone():
            cursor.execute('CREATE TABLE facelog(ts timestamp unique default current_timestamp, isSmiling boolean, smilingConfidence int, mood text, moodConfidence int)')

        cursor.execute('SELECT name FROM sqlite_master WHERE type="table" AND NAME="guestlog" ORDER BY name')
        if not cursor.fetchone():
            cursor.execute('CREATE TABLE guestlog(ts timestamp unique default current_timestamp, isSmiling boolean, smilingConfidence int, mood text, moodConfidence int, agemin int, ageminConfidence int, agemax int, agemaxConfidence int, ageest int, ageestConfidence int, gender text, genderConfidence int)')

        self.connection.commit()

    #
    # initialise the camera
    #
    def prepareCamera(self):
        # prepare the webcam
        pygame.camera.init()
        self.camera = pygame.camera.Camera(pygame.camera.list_cameras()[0], (900, 675))
        self.camera.start()

    #
    # take a single frame and store in the path provided
    #
    def captureFrame(self, filepath):
        # save the picture
        image = self.camera.get_image()
        pygame.image.save(image, filepath)

    #
    # gets a string representing the current time to the nearest second
    #
    def getTimestampString(self):
        return strftime("%Y%m%d%H%M%S", localtime())

    #
    # get attribute from face detection response
    #
    def getFaceDetectionAttributeValue(self, face, attribute):
        value = None
        if attribute in face['attributes']:
            value = face['attributes'][attribute]['value']
        return value

    #
    # get confidence from face detection response
    #
    def getFaceDetectionAttributeConfidence(self, face, attribute):
        confidence = None
        if attribute in face['attributes']:
            confidence = face['attributes'][attribute]['confidence']
        return confidence

    #
    # detects faces in the photo at the specified path, and returns info
    #
    def faceDetection(self, photopath):
        client = face_client.FaceClient(FACE_COM_APIKEY, FACE_COM_APISECRET)
        response = client.faces_recognize(DALELANE_FACETAG, file_name=photopath)
        faces = response['photos'][0]['tags']
        for face in faces:
            userid = ""
            faceuseridinfo = face['uids']
            if len(faceuseridinfo) > 0:
                userid = faceuseridinfo[0]['uid']
            if userid == DALELANE_FACETAG:
                smiling = self.getFaceDetectionAttributeValue(face, "smiling")
                smilingConfidence = self.getFaceDetectionAttributeConfidence(face, "smiling")
                mood = self.getFaceDetectionAttributeValue(face, "mood")
                moodConfidence = self.getFaceDetectionAttributeConfidence(face, "mood")
                self.storeResults(smiling, smilingConfidence, mood, moodConfidence)
            else:
                smiling = self.getFaceDetectionAttributeValue(face, "smiling")
                smilingConfidence = self.getFaceDetectionAttributeConfidence(face, "smiling")
                mood = self.getFaceDetectionAttributeValue(face, "mood")
                moodConfidence = self.getFaceDetectionAttributeConfidence(face, "mood")
                agemin = self.getFaceDetectionAttributeValue(face, "age_min")
                ageminConfidence = self.getFaceDetectionAttributeConfidence(face, "age_min")
                agemax = self.getFaceDetectionAttributeValue(face, "age_max")
                agemaxConfidence = self.getFaceDetectionAttributeConfidence(face, "age_max")
                ageest = self.getFaceDetectionAttributeValue(face, "age_est")
                ageestConfidence = self.getFaceDetectionAttributeConfidence(face, "age_est")
                gender = self.getFaceDetectionAttributeValue(face, "gender")
                genderConfidence = self.getFaceDetectionAttributeConfidence(face, "gender")
                # if the face wasnt recognisable, it might've been me after all, so ignore
                if "tid" in face and face['recognizable'] == True:
                    self.storeGuestResults(smiling, smilingConfidence, mood, moodConfidence, agemin, ageminConfidence, agemax, agemaxConfidence, ageest, ageestConfidence, gender, genderConfidence)
                    print face['tid']

    #
    # stores face results in the DB
    #
    def storeGuestResults(self, smiling, smilingConfidence, mood, moodConfidence, agemin, ageminConfidence, agemax, agemaxConfidence, ageest, ageestConfidence, gender, genderConfidence):
        cursor = self.connection.cursor()
        cursor.execute('INSERT INTO guestlog(isSmiling, smilingConfidence, mood, moodConfidence, agemin, ageminConfidence, agemax, agemaxConfidence, ageest, ageestConfidence, gender, genderConfidence) values(?, ?, ?, ?, ?, ?, ?, ?, ?, ?, ?, ?)',
                        (smiling, smilingConfidence, mood, moodConfidence, agemin, ageminConfidence, agemax, agemaxConfidence, ageest, ageestConfidence, gender, genderConfidence))
        self.connection.commit()

    #
    # stores face results in the DB
    #
    def storeResults(self, smiling, smilingConfidence, mood, moodConfidence):
        cursor = self.connection.cursor()
        cursor.execute('INSERT INTO facelog(isSmiling, smilingConfidence, mood, moodConfidence) values(?, ?, ?, ?)',
                        (smiling, smilingConfidence, mood, moodConfidence))
        self.connection.commit()

monitor = AudienceMonitor()
monitor.initialiseDB()
monitor.prepareCamera()
while True:
    photopath = "data/photo" + monitor.getTimestampString() + ".bmp"
    monitor.captureFrame(photopath)
    try:
        faceresults = monitor.faceDetection(photopath)
    except:
        print "Unexpected error:", sys.exc_info()[0]
    os.remove(photopath)
    sleep(POLL_FREQUENCY_SECONDS)