Unpacking binary data from MQTT in Javascript

While doing trawl of Stackoverflow for questions I might be able to help out with I came across this interesting looking question:

Receive binary with paho mqttws31.js

The question was how to unpack binary MQTT payloads into double precision floating point numbers in javascript when using the Paho MQTT over WebSockets client.

Normally I would just send floating point numbers as strings and parse them on the receiving end, but sending them as raw binary means much smaller messages, so I thought I’d see if I could help to find a solution.

A little bit of Googling turned up this link to the Javascript typed arrays which looked like it probably be in the right direction. At that point I got called away to look at something else so I stuck a quick answer in with a link and the following code snippet.

function onMessageArrived(message) {
  var payload = message.payloadByte()
  var doubleView = new Float64Array(payload);
  var number = doubleView[0];
  console.log(number);
}

Towards the end of the day I managed to have a look back and there was a comment from the original poster saying that the sample didn’t work. At that point I decided to write a simple little testcase.

First up quick little Java app to generate the messages.

import java.nio.ByteBuffer;
import org.eclipse.paho.client.mqttv3.MqttClient;
import org.eclipse.paho.client.mqttv3.MqttException;
import org.eclipse.paho.client.mqttv3.MqttMessage;

public class MessageSource {

  public static void main(String[] args) {
    try {
      MqttClient client = new MqttClient("tcp://localhost:1883", "doubleSource");
      client.connect();

      MqttMessage message = new MqttMessage();
      ByteBuffer buffer = ByteBuffer.allocate(8);
      buffer.putDouble(Math.PI);
      System.err.println(buffer.position() + "/" + buffer.limit());
      message.setPayload(buffer.array());
      client.publish("doubles", message);
      try {
        Thread.sleep(1000);
      } catch (InterruptedException e) {
        // TODO Auto-generated catch block
        e.printStackTrace();
      }
      client.disconnect();
    } catch (MqttException e) {
      // TODO Auto-generated catch block
      e.printStackTrace();
    }
  }
}

It turns out that using typed arrays is a little more complicated and requires a bit of work to populate the data structures properly. First you need to create an ArrayBuffer of the right size, then wrap it in a Uint8Array in order to populate it, before changing to the Float64Array. After a little bit of playing around I got to this:

function onMessageArrived(message) {
  var payload = message.payloadBytes
  var length = payload.length;
  var buffer = new ArrayBuffer(length);
  uint = new Uint8Array(buffer);
  for (var i=0; i<length; i++) {
	  uint[i] = payload[i];
  }
  var doubleView = new Float64Array(uint.buffer);
  var number = doubleView[0];
  console.log("onMessageArrived:"+number);
};

But this was returning 3.207375630676366e-192 instead of Pi. A little more head scratching and the idea of checking the byte order kicked in:

function onMessageArrived(message) {
  var payload = message.payloadBytes
  var length = payload.length;
  var buffer = new ArrayBuffer(length);
  uint = new Uint8Array(buffer);
  for (var i=0; i<length; i++) {
	  uint[(length-1)-i] = payload[i];
  }
  var doubleView = new Float64Array(uint.buffer);
  var number = doubleView[0];
  console.log("onMessageArrived:"+number);
};

This now gave an answer of 3.141592653589793 which looked a lot better. I still think there may be a cleaner way to do with using a DataView object, but that’s enough for a Friday night.

EDIT:

Got up this morning having slept on it and came up with this:

function onMessageArrived(message) {
  var payload = message.payloadBytes
  var length = payload.length;
  var buffer = new ArrayBuffer(length);
  uint = new Uint8Array(buffer);
  for (var i=0; i<length; i++) {
	  uint[i] = payload[i];
  }
  var dataView = new DataView(uint.buffer);
  for (var i=0; i<length/8; i++) {
      console.log(dataView.getFloat64((i*8), false));
  }
};

This better fits the original question in that it will decode an arbitrary length array of doubles and since we know that Java is big endian, we can set the little endian flag to false to get the right conversion without having to re-order the array as we copy it into the buffer (which I’m pretty sure wouldn’t have worked for more than one value).

Node-RED Flows that make flows

Executive Summary

When a mummy function node and a daddy function node love each other very much, the daddy node injects a payload into the mummy node through a wire between them, and a new baby message flow is made, which comes out of mummy’s output terminal. The baby’s name is Jason.

Where did this idea come from?

In Node-RED, if you export some nodes to the clipboard, you will see the flow and its connections use a JSON wire format.

For a few weeks I’ve been thinking about generating that JSON programmatically, in order to create flows which encode various input and output capabilities and functions, according to some input parameters which give the specific details of what the flow is to do.

I think there’s been an alignment of planets that’s occurred, which led to this idea:

@stef_k_uk has been talking to me about deploying applications onto “slave” Raspberry Pis from a master Pi.

Dritan Kaleshi and Terence Song from Bristol University have been discussing using the Node-RED GUI as a configurator tool for a system we’re working on together, and also we’ve been working on representing HyperCat catalogues in Node-RED, as part of our Technology Strategy Board Internet of Things project, IoT-Bay.

@rocketengines and I were cooking up cool ideas for cross-compiling Node-RED flows into other languages, a while back, and

in a very productive ideas afternoon last week, @profechem and I stumbled upon an idea for carrying the parser for a data stream along with the data itself, as part of its meta-data description.

All of the above led me to think “wouldn’t it be cool if you could write a flow in Node-RED which produced as output another flow.” And for this week’s #ThinkFriday afternoon, I gave it a try.

First experiment

The first experiment was a flow which had an injector node feeding a JSON object of parameters into a flow which generated the JSON for an MQTT input node, a function node to process the incoming data in some way, and an MQTT output node. So it was the classic subscribe – process – publish pattern which occurs so often in our everday lives (if you live the kind of life that I do!).
first Node-RED flow
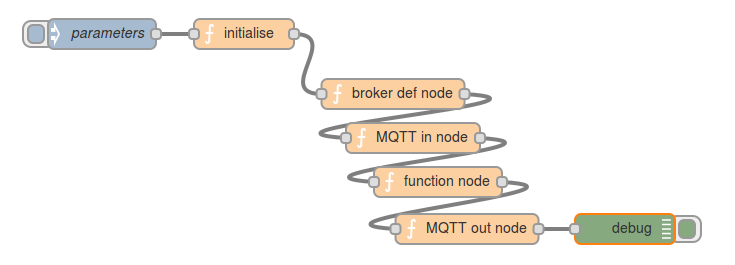
And here’s the Node-RED flow which generates that: flow-generator

So if you sent in
{
"broker": "localhost",
"input": "source_topic",
"output": "destination_topic",
"process": "msg.payload = \"* \"+msg.payload+\" *\";\nreturn msg;"
}

the resulting JSON would be the wire format for a three-node flow which has an MQTT input node subscribed to “source_topic” on the broker on “localhost”, a function node which applies a transformation to the data: in this case, wrapping it with an asterisk at each end, and finally an MQTT publish node sending it to “destination_topic” on “localhost”.
N.B. make sure you escape any double quotes in the “process” string, as shown above.

The JSON appears in the debug window. If you highlight it, right-mouse – Copy, and then do Import from… Clipboard in Node-RED and ctrl-V the JSON into the text box and click OK, you get the three node flow described above ready to park on your Node-RED worksheet and then Deploy.
the resulting And it works!!

So what?

So far so cool. But what can we do with it?

The next insight was that the configuration message (supplied by the injector) could come from somewhere else. An MQTT topic, for example. So now we have the ability for a data stream to be accompanied not only by meta-data describing what it is, but also have the code which parses it.
flow with added MQTT configurator
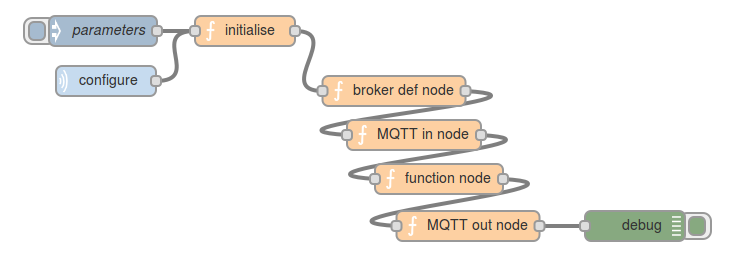
My thinking is that if you subscribe to a data topic, say:
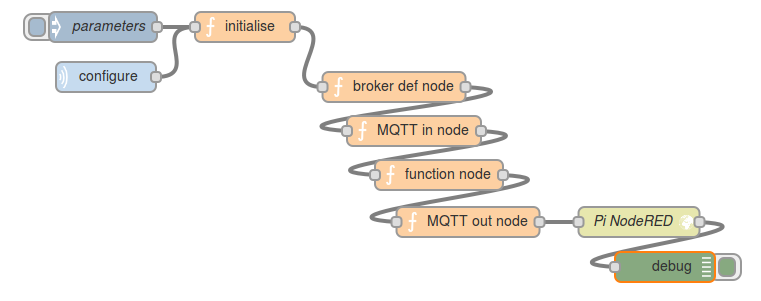
andy/house/kitchen/temperature
there could be two additional topics, published “retained” so you get them when you first subscribe, and then any updates thereafter:

A metadata topic which describes, in human and/or machine readable form, what the data is about, for example:
andy/house/kitchen/temperature/meta with content
“temperature in degrees Celcius in the kitchen at Andy’s house”

And a parser topic which contains the code which enables the data to be parsed:
andy/house/kitchen/temperature/parser with content
msg.value = Math.round(msg.payload) + \" C\"; return msg;
(that’s probably a rubbish example of a useful parser, but it’s just for illustration!)

If you’re storing your data in a HyperCat metadata catalogue (and you should think about doing so if you’re not – see @pilgrimbeart‘s excellent HyperCat in 15 minutes presentation), then the catalogue entry for the data point could include the URI of the parser function along with the other meta-data.

And then…

Now things get really interesting… what if we could deploy that flow we’ve created to a node.js run-time and set it running, as if we’d created the flow by hand in the Node-RED GUI and clicked “Deploy”?
Well we can!

When you click Deploy, the Node-RED GUI does an HTTP POST to “/flows” in the node.js run-time that’s running the Node-RED server (red.js), and sends it the list of JSON objects which describe the flow that you’ve made.
So… if we hang an HTTP request node off the end of the flow which generates the JSON for our little flow, then it should look like a Deploy from a GUI.

Et voila!
flow that deploys to a remote Node-RED
Note that you have to be careful not to nuke your flow-generating-flow by posting to your own Node-RED run-time! I am posting the JSON to Node-RED on my nearby Raspberry Pi. When you publish a configuration message to the configuration topic of this flow, the appropriate set of nodes is created – input – process – output – and then deployed to Node-RED on the Pi, which dutifully starts running the flow, subscribing to the specified topic, transforming the data according to the prescribed processing function, and publishing it to the specified output topic.

I have to say, I think this is all rather exciting!

@andysc

Footnote:

It’s worth mentioning, that Node-RED generates unique IDs for nodes that look like “8cf45583.109bf8”. I’m not sure how it does that, so I went for a simple monotonically increasing number instead (1, 2 …). It seems to work fine, but there might be good reasons (which I’m sure @knolleary will tell me about) why I should do it the “proper” way.

At ThingMonk 2013

I attended ThingMonk 2013 conference partly because IBM’s doing a load of work around the Internet of Things (IoT). I figured it would be useful to find out what’s happening in the world of IoT at the moment. Also, I knew that, as a *Monk production, the food would be amazing.

What is the Internet of Things?

If you’re reading this, you’re familiar with using devices to access information, communicate, buy things, and so on over the Internet. The Internet of Things, at a superficial level, is just taking the humans out of the process. So, for example, if your washing machine were connected to the Internet, it could automatically book a service engineer if it detects a fault.

I say ‘at a superficial level’ because there are obviously still issues relevant to humans in an automated process. It matters that the automatically-scheduled appointment is convenient for the householder. And it matters that the householder trusts that the machine really is faulty when it says it is and that it’s not the manufacturer just calling out a service engineer to make money.

This is how James Governor of RedMonk, who conceived and hosted ThingMonk 2013, explains IoT:

What is ThingMonk 2013?

ThingMonk 2013 was a fun two-day conference in London. On Monday was a hackday with spontaneous lightning talks and on Tuesday were the scheduled talks and the evening party. I wasn’t able to attend Monday’s hackday so you’ll have to read someone else’s write-up about that (you could try Josie Messa’s, for instance).

The talks

I bought my Arduino getting started kit (which I used for my Christmas lights energy project in 2010) from Tinker London so I was pleased to finally meet Tinker’s former-CEO, Alexandra Dechamps-Sonsino, at ThingMonk 2013. I’ve known her on Twitter for about 4 years but we’d never met in person. Alex is also founder of the Good Night Lamp, which I blogged about earlier this year. She talked at ThingMonk about “the past, present and future of the Internet of Things” from her position of being part of it.

Alexandra Deschamps-Sonsino, @iotwatch

I think it was probably Nick O’Leary who first introduced me to the Arduino, many moons ago over cups of tea at work. He spoke at ThingMonk about wiring the Internet of Things. This included a demo of his latest project, NodeRED, which he and IBM have recently open sourced on GitHub.

Nick O'Leary talks about wiring the Internet of Things
Nick O’Leary talks about wiring the Internet of Things

Sadly I missed the previous day when it seems Nick and colleagues, Dave C-J and Andy S-C, won over many of the hackday attendees to the view that IBM’s MQTT and NodeRED are the coolest things known to developerkind right now. So many people mentioned one or both of them throughout the day. One developer told me he didn’t know why he’d not tried MQTT 4 years ago. He also seemed interested in playing with NodeRED, just as soon as the shock that IBM produces cool things for developers had worn off.

Ian Skerrett from Eclipse talked about the role of Open Source in the Internet of Things. Eclipse has recently started the Paho project, which focuses on open source implementations of the standards and protocols used in IoT. The project includes IBM’s Really Small Message Broker and Roger Light’s Mosquitto.

Ian Skerrett from Eclipse

Andy Piper talked about the role of signals in the IoT.

IMG_1546

There were a couple of talks about people’s experiences of startups producing physical objects compared with producing software. Tom Taylor talked about setting up Newspaper Club, which is a site where you can put together and get printed your own newspaper run. His presentation included this slide:

IMG_1534Matt Webb talked about producing Little Printer, which is an internet-connected device that subscribes to various sources and prints them for you on a strip of paper like a shop receipt.

IMG_1550Patrick Bergel made the very good point in his talk that a lot of IoT projects, at the moment, are aimed at ‘non-problems’. While fun and useful for learning what we can do with IoT technologies, they don’t really address the needs of real people (ie people who aren’t “hackers, hipsters, or weirdos”). For instance, there are increasing numbers of older people who could benefit from things that address problems social isolation, dementia, blindness, and physical and cognitive impairments. His point was underscored throughout the day by examples of fun-but-not-entirely-useful-as-is projects, such as flying a drone with fruit. That’s not to say such projects are a waste of time in themselves but that we should get moving on projects that address real problems too.

IMG_1539The talk which chimed the most with me, though, was Claire Rowland‘s on the important user experience UX issues around IoT. She spoke about the importance of understanding how users (householders) make sense of automated things in their homes.

IMG_1587

The book

I bought a copy of Adrian McEwan‘s Designing The Internet of Things book from Alex’s pop-up shop, (Works)shop. Adrian’s a regular at OggCamp and kindly agreed to sign my copy of his book for me.

Adrian McEwan and the glamorous life of literary reknown.

The food

The food was, as expected, amazing. I’ve never had bacon and scrambled egg butties that melt in the mouth before. The steak and Guinness casserole for lunch was beyond words. The evening party was sustained with sushi and tasty curry.

Thanks, James!

The post At ThingMonk 2013 appeared first on LauraCowen.co.uk.

MQTT Joggler

Spurred on by the success of getting Mosquitto working on a Raspberry Pi, I recently had a play with MQTT on the Joggler. The O2 Joggler is still a great device for hacking and I currently have SqeezePlay OS running on it.

The reason I wanted to try and get MQTT on the Joggler was to make use of its light sensor, and publish light levels over MQTT. It all turned out to be pretty simple since most of the work has already been done by other people!

First thing to do was read the light sensor and get that working with an MQTT client. I had to skip some of Andy’s instructions and just built the client code rather than attempting to get doxygen working. Once I’d mashed up the light sensor code and publish example I could compile the worlds most pointless MQTT publisher:

gcc -Wall publightsensor.c -L../bin/linux_ia32 -I../src -lmqttv3c -lpthread -o publightsensor

Next it was time to check the results. This too was quick and easy thanks to the MQTT sandbox server, which has a handy HTTP bridge. And the final result... was a completely unscientific and slightly dingy light level 4! Now I'll be able to turn on a lamp using an unreliable RF controlled socket and see whether it worked or not!

Update: the code really is all in the existing examples but I've created a Github Gist in case it's any help: mqttjogglermashup.c (11 February 2013)


developerWorks Days Zurich 2012

This week I had a day out of the office to go to Zurich to talk at this years IBM developerWorks Days. I had 2 sessions back to back in the mobile stream, the first an introduction to Android Development and the second on MQTT.

The slots were only 35mins long (well 45mins, but we had to leave 5 mins on each end to let people move round) so there was a limit to how much detail I could go into. With this in mind I decided the best way to give people a introduction to Android Development in that amount of time was to quickly walk through writing reasonably simple application. The application had to be at least somewhat practical, but also very simple so after a little bit of thinking about I settled on an app to download the latest image from the web comic XKCD. There are a number apps on Google Play that already do this (and a lot better) but it does show a little Activity GUI design. I got through about 95% of the app live on stage and only had to copy & paste the details for the onPostExecute method to clear the progress dialog and update the image in the last minute to get it to the point I could run it in the emulator.

Here are the slides for this session

And here is the Eclipse project for the Application I created live on stage:
http://www.hardill.me.uk/XKCD-demo-android-app.zip

The MQTT pitch was a little easier to set up, there is loads of great content on MQTT.org to use as a source and of course I remembered to include the section on the MQTT enabled mouse traps and twittering ferries from Andy Stanford-Clark.

Here are the slides for the MQTT session:

For the Demo I used the Javascript d3 topic tree viewer I blogged about last week and my Raspberry Pi running a Mosquitto broker and a little script to publish the core temperature, load and uptime values. The broker was also bridged to my home broker to show the feed from my weather centre and some other sensors.

Recent hacktivity

This time of year seems to be hacking season and over the last few days I’ve been along to two hackdays!

Friday was IBM’s internal Social Business Hackday. There was some MQTT hacking, a z/OS hack, hacks with Lotus Connections, hacks that could be the future of Lotus Connections, and I was attempting to hack a work around for a Jazz work item. And that was just at the Hursley local event! We were able to link up with a few other labs, but over two days there were IBMers hacking around the globe. There are going to be a lot of amazing projects to choose from when it comes to voting.

(There are a few more photos from HackDay X, and previous hackdays, on the IBM hackday group on flickr.)

For round two, today was the soutHACKton hack day. By the time I arrived the soldering and drilling had already begun!! Unfortunately I wasn’t able to stay long so I’m hoping there’ll me more of these in the future. I did just about have time to try out an idea I had to hack an old doorbell to sense people using the door knocker. A while ago I had accidentally created a touch sensor with a 555 timer while attempting to build another circuit. So my cunning plan was to deliberately create a 555 touch switch and connect it to the bolt on the inside of the front door. Unfortunately the best I could manage today was a two wire touch sensor, which isn’t going to work. At least not without leaving a wire hanging out of the letter box with some instructions attached! Unless someone who knows more about electronics can suggest a plan B, I may just resort to a boring doorbell button instead!!


Even More MQTT enabled TVs

Kevin Modelling the headset

A project at work recently came up to do with using one of the Emotiv headsets to help out a former Italian IBMer who was suffering from locked in syndrome. The project was being led by Kevin Brown who was looking for ways to use the headset to drive things sending email and browsing the web but he was also looking for a way to interact with some other tech around the house. The TV was the first on the list.

Continuing on from my previous work with controlling TVs and video walls with MQTT I said I would have a crack at this. My earlier solution was limited to LG TVs with serial ports and this needed to work with any make so a different approach was needed. It also needed to run on Windows so it was also a chance to play with C# and .Net.

To be TV agnostic it was decided to use a USB IR remote from a company called RedRat. They make a number of solutions, but their RedRat III was perfect for what was needed.

RedRat IR transmitter & receiver

The RedRat API comes with bindings for C++, .Net on Windows (and a LIRC plugin for Linux). The RedRat III is not just a IR transmitter, it is also a receiver which means it can “learn” from existing remote controls so it can be used with any TV.

Kevin is using Emotiv headset to drive Dasher as the input device. Dasher is a sort of keyboard replacement that allows the user to build up words using at a minimum a single input e.g. a single push button. As well as building words other actions can be added to the selector, Kevin added actions for browsing and also to control the TV. These actions publish MQTT messages to a topic with payloads like “volUp”, “chanDown” or “power”.

So now we had the inputs it was time to get round to writing the code to turn those messages into IR signals. There are 2 MQTT .NET libraries listed on the MQTT.org software page. I grabbed the first off the list MqttDotNet and got things working pretty quickly.

The following few lines sets up a connection and subscribes to a topic.

String connectionString = "tcp://" + 
  Properties.Settings.Default.host.Trim() + ":" +
  Properties.Settings.Default.port;
IMqtt client = MqttClientFactory.CreateClient(connectionString, "mqtt2ir");
try
{
	client.Connect(true);
	client.PublishArrived += new PublishArrivedDelegate(onMessage);
	client.ConnectionLost += new ConnectionDelegate(connectionLost);
	client.Subscribe(Properties.Settings.Default.topic.Trim(), 
	  QoS.BestEfforts);
}

Where the onMessage callback looks like this:

bool onMessage(object sender, PublishArrivedArgs msg)
{
	String command = msg.Payload.ToString().Trim();
	IRPacket packet = loadSignal(command);
	if (packet != null) 
	{
		redrat.OutputModulatedSignal(packet);
	}
	return true;
}

MQTT2IR Settings Window

And that is pretty much the meat of the whole application, the rest was just some code to initialise the RedRat and to turn it into a System Tray application with a window for entering the broker details and training the commands.

Unfortunately just a few days before we were due to have delivered this project we learned that the intended recipient had picked up a respiratory infection and had passed away. I would like to extend my thoughts to their family and I hope we can find somebody who may find this work useful in the future.

MQTT powered video wall

Scaling things up a little from my first eightbar post.

This was one of those projects that just sort of “turned up”. About 3 weeks ago one of the managers for the ETS department in Hursley got a call from the team building the new IBM Forum in IBM South Bank. IBM Forums are locations where IBM can showcase technologies and solutions for customers. The team were looking for a way to control a video wall and a projector to make them show specific videos on request. The requests will come from pedestals known as “provokers”, each having a perspex dome holding a thought-provoking item. The initial suggestions had been incredibility expensive and we were asked if we could come up with a solution.

Provoker

The provokers have access to power and an Ethernet connection. Taking all that into account a few ideas came to mind but the best seamed to be an Arduino board with Ethernet support and a button/sensor to trigger the video. There is a relatively new arduino board available that has a built in Ethernet shield which seemed perfect for this project. Also, since a number of the items in the provokers would be related to IBM’s Smarter Planet initiative, it made sense to use MQTT as a messaging layer as this has been used to implement a number of solutions in this space.

Nick O’Leary was enlisted to put together the hardware and also the sketch for the Arduino as he had already written a MQTT client for Arduino in the past.

Each provoker will publish a message containing a playload of “play” to a topic like

provoker/{n}/action

Where ‘{n}’ is the unique number identifying which of the 6 provokers sent the message.

To provide some feedback to the guest that pressed the button, the LED has been made to pulse while one of the provoker-specific videos is playing. This is controlled by each provoker subscribing to the following topic

provoker/{n}/ack

Sending “play” to this topic causes the LED pluse, sending “stop” turns the LED solid again.

The video wall will be driven by software called Scala InfoChannel which has a scripting interface supporting (among other things) Python. So a short script to subscribe to the ‘action’ topics and to publish on on the ‘ack’ got the videos changing on demand.

And sat in the middle is an instance of the Really Small Message Broker to tie everything together.

Arduino in a box

This was also the perfect place to use some of my new “MQTT Inside” stickers.

First sticker deployed

This project only used one of the digital channels (for the button) and one of the analogue channels (for the LED) available on the Arduino – which leaves a lot of room for expansion for these type of devices. I can see them being used for future projects.

Parts list

  1. Arduino Ethernet
  2. Blue LED Illuminated Button
  3. A single resistor to protect the LED
  4. 9v power supply
  5. Sparkfun Case